LAB MANUAL
Practical 1.1

Metadata Examination Using Windows File Properties

Practical Title

Examination of File Metadata Using Windows File Properties

Aim

To extract and examine basic metadata from a digital image using the built-in Windows File Properties feature.

Objective

Students will learn how to identify and interpret metadata such as file size, creation date, modification date, image dimensions, and camera information from a digital image.

Requirements

Hardware
Evidence File
Software
Background

Whenever a digital photograph is created, Windows stores certain information about the file. This information is known as metadata (data about data). Metadata can provide valuable forensic evidence regarding:
Cyber forensic investigators often examine metadata as the first step in a digital investigation.

Procedure

Step 1: Locate the Evidence File
Open File Explorer.
Navigate to the folder containing the evidence image.
Locate the file named:
Evidence_A001.jpg
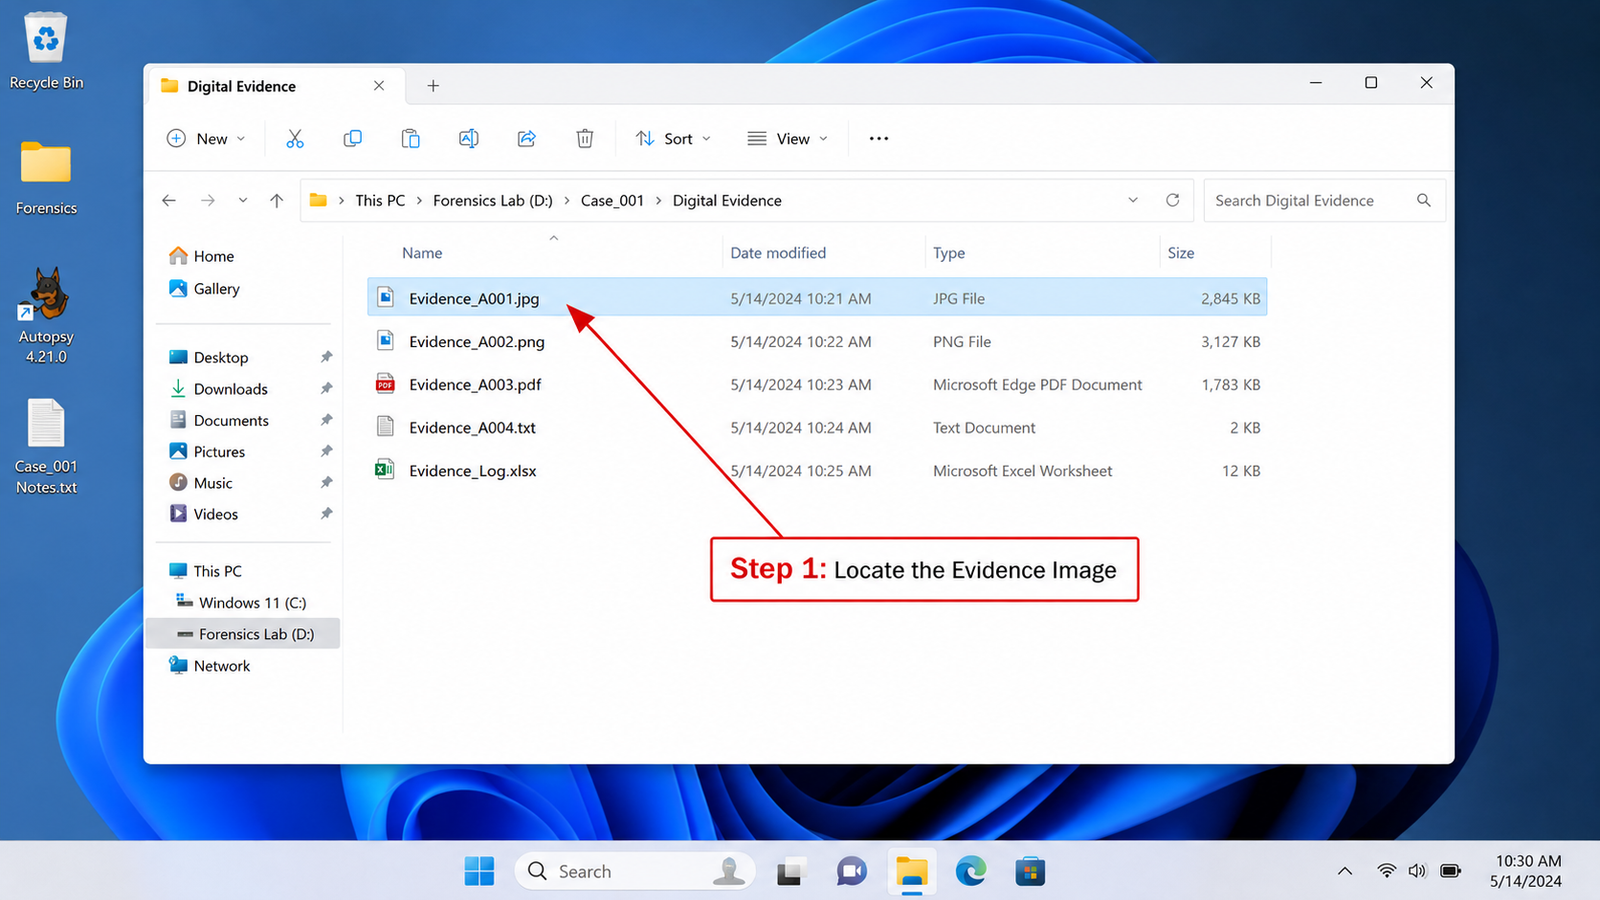
Observation
Students should identify:
File name
File icon
File location
Step 2: Open File Properties
Right-click the image file.
Select Properties from the context menu.
A new window titled:

Evidence_A001.jpg Properties

will appear.

Observation

Students should observe:
General Tab
Security Tab
Details Tab

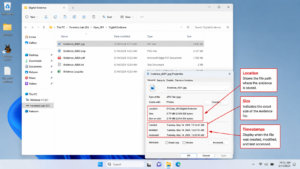
Step 3: Examine General Metadata

In the General tab, record:
Metadata Field | Description |
File Name | Name of image |
Type of File | JPG/JPEG |
File Size | Size in KB/MB |
Location | Folder path |
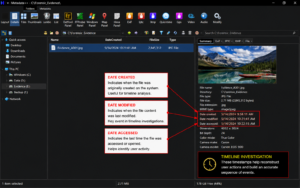
Created | Date file was created |
Modified | Date file was modified |
Accessed | Last access time |
Step 4: Open Details Tab

Click the Details tab.

Windows will display image metadata.

Step 5: Examine Image Metadata

Record the following information:
Metadata Field | Description |
Image Width | Width in pixels |
Image Height | Height in pixels |
Horizontal Resolution | DPI |
Vertical Resolution | DPI |
Bit Depth | Color depth |

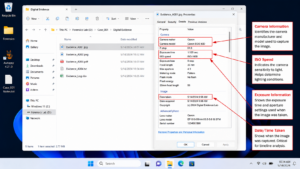
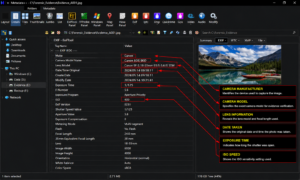
Step 6: Examine Camera Information

Scroll further down.

If available, record:
Metadata Field | Description |
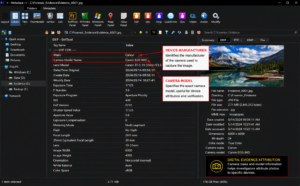
Camera Maker | Device manufacturer |
Camera Model | Device model |
Date Taken | Date photograph captured |
Exposure Time | Camera setting |
ISO Speed | Camera sensitivity |
Step 7: Record Findings

Students should complete the following table:
Metadata Field | Value |
File Name | |
File Size | |
Date Created | |
Date Modified | |
Image Width | |
Image Height | |
Camera Maker | |
Camera Model | |
Date Taken | |
Forensic Interpretation Questions
When was the image created?
Has the file been modified after creation?
Which device captured the photograph?
What is the image resolution?
Can this metadata be useful as digital evidence? Explain.
Expected Learning Outcome

After completing this practical, students will be able to:
Define metadata.
Locate metadata using Windows File Properties.
Identify timestamps and image attributes.
Extract basic forensic evidence from digital files.
Understand the importance of metadata in cyber forensic investigations.
Practical 1.2

Metadata Examination Using Command Prompt (CMD)

Practical Title

Extraction of File Metadata Using Command Prompt (CMD)

Aim

To extract and examine file metadata using Windows Command Prompt commands.

Objective

Students will learn how forensic investigators use command-line tools to collect metadata such as file size, creation date, modification date, file attributes, and file path without opening the file.

Requirements

Hardware
Evidence File
Software
Background

Cyber forensic investigators frequently use command-line tools because they provide quick access to evidence information and are useful when GUI-based tools are unavailable.

Command Prompt allows investigators to:
This information can help establish a digital timeline during an investigation.
Procedure
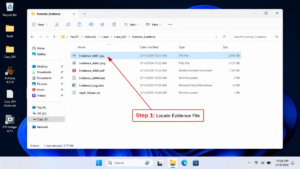
Step 1: Locate the Evidence File
Open File Explorer.
Navigate to the folder containing:
Evidence_A001.jpg
Note the file location.
Example:

C:\Forensic_Evidence\Images\

Observation

Students should record:
Metadata Field | Value |
File Name | Evidence_A001.jpg |
File Location | |
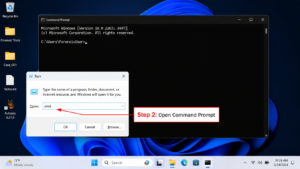
Step 2: Open Command Prompt
Press Windows + R
Type:
cmd
Press Enter
Command Prompt window will open.
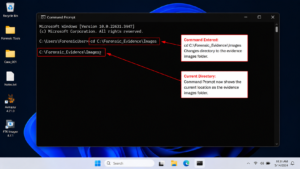
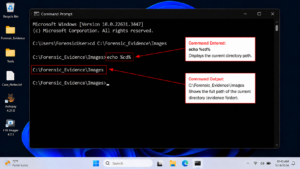
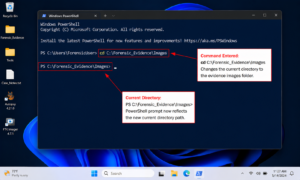
Step 3: Navigate to Evidence Folder
Use the Change Directory command:
cd C:\Forensic_Evidence\Images
Press Enter.
Verify location using:
cd
Observation
Students should confirm they are inside the evidence directory.
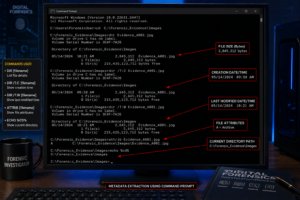
Step 4: View Basic File Metadata
Type:
dir Evidence_A001.jpg
Press Enter.
Information Obtained
File Name
File Size
Last Modified Date
Last Modified Time
Example Output
31/05/2026 10:15 AM 3,245,678 Evidence_A001.jpg
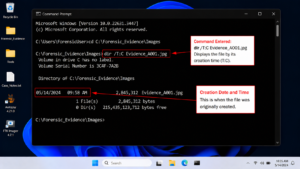
Step 5: Extract Creation Time
Type:
dir /T:C Evidence_A001.jpg
Press Enter.
Purpose
Displays the file creation timestamp.
Example Output
30/05/2026 09:45 AM 3,245,678 Evidence_A001.jpg
Observation
Record:
Metadata Field | Value |
Creation Date | |
Creation Time | |
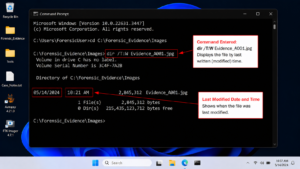
Step 6: Extract Last Modified Time

Type:

dir /T:W Evidence_A001.jpg

Press Enter.

Purpose

Displays the last write (modification) timestamp.

Example Output

31/05/2026  10:15 AM      3,245,678 Evidence_A001.jpg

Observation

Record:
Metadata Field | Value |
Modified Date | |
Modified Time | |
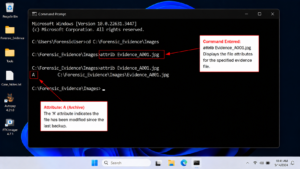
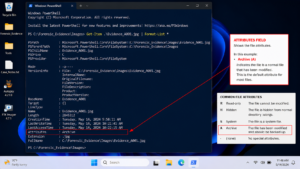
Step 7: View File Attributes

Type:

attrib Evidence_A001.jpg

Press Enter.

Example Output

A    Evidence_A001.jpg

Common Attributes
Attribute | Meaning |
A | Archive |
R | Read Only |
H | Hidden |
S | System |
Observation

Record the attribute values.

Step 8: Verify Complete File Path

Type:

echo %cd%

Press Enter.

Example Output

C:\Forensic_Evidence\Images

Purpose

Identifies the exact evidence location.

Step 9: Record Findings

Students should complete:
Metadata Field | Value |
File Name | |
File Size | |
Creation Date | |
Creation Time | |
Modified Date | |
Modified Time | |
File Attributes | |
Evidence Path | |
Forensic Interpretation Questions

Q1.

When was the evidence file created?

Q2.

When was it last modified?

Q3.

Does the file have any special attributes?

Q4.

What is the size of the evidence file?

Q5.

Why is file path information important in a forensic investigation?

Q6.

Can modification timestamps help reconstruct an incident timeline?

Expected Learning Outcome

After completing this practical, students will be able to:
Use Command Prompt for metadata extraction.
Identify creation and modification timestamps.
Determine file size and location.
Understand file attributes.
Collect basic forensic evidence using CLI tools.
Practical 1.3

Metadata Examination Using PowerShell

Practical Title

Advanced Metadata Extraction Using Windows PowerShell

Aim

To extract and examine detailed file metadata using Windows PowerShell for forensic investigation purposes.

Objective

Students will learn how cyber forensic investigators use PowerShell to collect advanced metadata from digital evidence, including:
File Properties
File Attributes
Creation Time
Modification Time
Last Access Time
File Path
File Extension
File Size
PowerShell provides significantly more information than traditional Command Prompt commands and is commonly used during digital forensic acquisition and triage.

Requirements

Hardware
Evidence File

Evidence_A001.jpg

Software
Background

PowerShell is a powerful command-line and scripting environment developed by Microsoft.

In cyber forensic investigations, PowerShell is frequently used because it can:
Collect evidence metadata rapidly
Generate automated reports
Extract detailed file properties
Analyze multiple files simultaneously
Assist in forensic triage and acquisition
Unlike File Properties or CMD, PowerShell can reveal a much larger set of metadata attributes.

Step-by-Step Procedure

Step 1: Locate the Evidence File
Open File Explorer.
Navigate to the evidence folder.
Example:

C:\Forensic_Evidence\Images\
Verify that:
Evidence_A001.jpg

is present.

Observation

Record:
Metadata Field | Value |
File Name | Evidence_A001.jpg |
Evidence Location | |
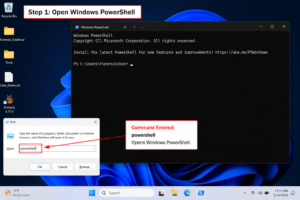
Step 2: Open Windows PowerShell

Method 1
Press Windows + X
Select Windows PowerShell
OR

Method 2
Press Windows + R
Type:
powershell
Press Enter
Step 3: Navigate to Evidence Folder
Type:
cd C:\Forensic_Evidence\Images
Press Enter.
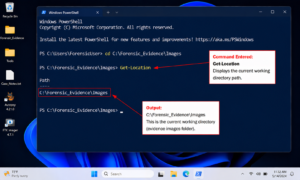
Verify location:
Get-Location
Example Output
Path
----
C:\Forensic_Evidence\Images
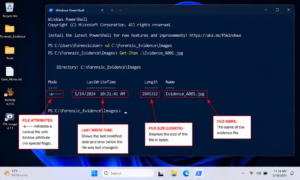
Step 4: Extract Basic File Metadata
Type:
Get-Item .\Evidence_A001.jpg
Press Enter.
Example Output
Directory: C:\Forensic_Evidence\Images
Mode LastWriteTime Length Name
---- ------------- ------ ----
-a---- 31-05-2026 10:15 AM 3245678 Evidence_A001.jpg
Information Obtained
File Name
File Size
Last Modified Date
File Attributes
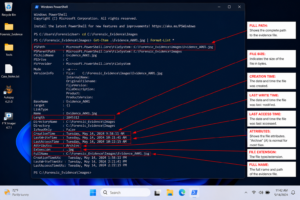
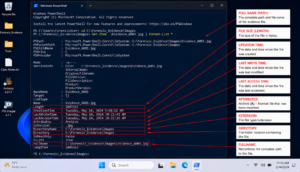
Step 5: Extract Detailed Metadata

Type:

Get-Item .\Evidence_A001.jpg | Format-List *

Press Enter.

This command displays all available metadata associated with the file.


Step 6: Examine Important Metadata Fields

Students should identify the following:
Metadata Field | Description |
Name | File name |
FullName | Complete file path |
Length | File size |
CreationTime | File creation timestamp |
LastWriteTime | Modification timestamp |
LastAccessTime | Last access timestamp |
Attributes | File attributes |
Extension | File extension |
Directory | Parent folder |
Step 7: Record File Attributes

Locate:

Attributes : Archive

Possible values include:
Attribute | Meaning |
Archive | Standard file |
ReadOnly | Cannot be modified |
Hidden | Hidden file |
System | Operating system file |

Step 8: Record Timestamps

Locate:

CreationTime

LastWriteTime

LastAccessTime

Observation Table
Timestamp Type | Value |
Creation Time | |
Last Write Time | |
Last Access Time | |
Step 9: Record Findings

Students should complete:
Metadata Field | Value |
File Name | |
Full Path | |
File Size | |
File Extension | |
Creation Time | |
Last Write Time | |
Last Access Time | |
Attributes | |
Directory Name | |
Forensic Interpretation Questions

Q1.

When was the evidence file created?

Q2.

When was it last modified?

Q3.

Has the file been recently accessed?

Q4.

What file attributes are associated with the evidence?

Q5.

How can PowerShell assist forensic investigators during evidence acquisition?

Q6.

Why is Last Access Time important in an investigation?

Expected Learning Outcome

After completing this practical, students will be able to:
Use PowerShell to acquire digital evidence metadata.
Extract detailed file properties.
Identify timestamps relevant to investigations.
Examine file attributes.
Understand PowerShell's role in forensic acquisition and triage.
Practical 1.4:
Metadata Examination Using Metadata++
Practical Title
Comprehensive Metadata Analysis Using Metadata++
Aim
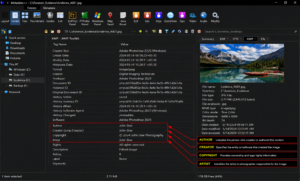
To perform professional metadata examination of a digital image using Metadata++ and identify forensic artifacts such as EXIF information, camera details, software information, timestamps, author information, and other hidden metadata.
Objective
Students will learn how forensic investigators use Metadata++ to perform detailed metadata analysis and uncover information that may not be visible through Windows Properties, CMD, or PowerShell.
Students will examine:
Complete Metadata
EXIF Tags
Camera Information
Software Information
Author Information
GPS Data (if available)
File Properties
Timestamps
Requirements

Hardware
Evidence File

Evidence_A001.jpg

Software

Metadata++ (Free Metadata Analysis Tool)

Students should install Metadata++ before starting the practical.

Background

Metadata++ is a powerful metadata examination tool commonly used by investigators, forensic analysts, digital evidence examiners, and OSINT researchers.

Unlike standard Windows tools, Metadata++ can reveal:
Hidden EXIF data
Device information
Editing software details
GPS coordinates
Author information
Digital camera settings
Embedded metadata fields
This makes it extremely useful during cybercrime investigations and digital evidence analysis.

Step-by-Step Procedure

Step 1: Launch Metadata++
Open Metadata++.
Wait for the application to load.
Observation

Students should identify:
Navigation Panel
Metadata Categories
Metadata Details Window
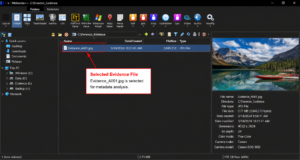
Step 2: Open Evidence File
Click File → Open
Browse to:
C:\Forensic_Evidence\Images\
Select:
Evidence_A001.jpg
Click Open
The file metadata will be displayed automatically.
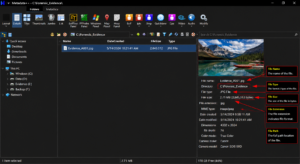
Step 3: Examine General File Information
Locate the General Information section.
Record:
Metadata Field | Description |
File Name | Evidence file name |
File Size | Evidence size |
File Type | JPEG/JPG |
File Extension | Extension |
File Path | Storage location |
Step 4: Examine Timestamp Information

Locate the timestamp fields.

Record:
Metadata Field | Description |
Date Created | Creation timestamp |
Date Modified | Modification timestamp |
Date Accessed | Last accessed timestamp |
Importance

Investigators use timestamps to establish a timeline of events.


Step 5: Examine EXIF Metadata

Expand the EXIF section.

Record:
Metadata Field | Description |
Date Taken | Image capture date |
Camera Manufacturer | Device manufacturer |
Camera Model | Device model |
Lens Model | Camera lens |
Exposure Time | Camera settings |
ISO Speed | Camera sensitivity |
Flash | Flash usage |
Step 6: Examine Device Information

Locate camera/device information.

Example metadata:

Make: Canon

Model: Canon EOS 90D

OR

Make: Samsung

Model: Galaxy S24 Ultra

Observation

Record:
Metadata Field | Value |
Device Manufacturer | |
Device Model | |
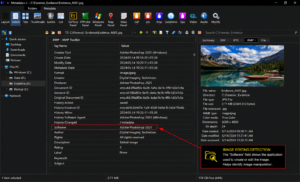
Step 7: Examine Software Information

Locate:

Software

Processing Software

Application Name

Examples

Adobe Photoshop 2025

Snapseed

Lightroom

Forensic Importance

Software information may indicate that an image has been edited.


Step 8: Examine Author Information

Locate metadata fields such as:

Author

Creator

Owner Name

Copyright

Artist

Observation

Record:
Metadata Field | Value |
Author | |
Creator | |
Copyright | |
Forensic Importance

These fields may help attribute a file to a specific individual or organization.


Step 9: Examine GPS Metadata (If Available)

Locate:

GPS Latitude

GPS Longitude

GPS Altitude

Observation

Record:
Metadata Field | Value |
Latitude | |
Longitude | |
Altitude | |
Forensic Importance

GPS data can reveal where the image was captured.

Step 10: Complete Metadata Documentation

Students should create the following evidence table:
Metadata Category | Value |
File Name | |
File Size | |
File Path | |
Date Created | |
Date Modified | |
Date Taken | |
Camera Manufacturer | |
Camera Model | |
Software Used | |
Author | |
GPS Coordinates | |
Forensic Interpretation Questions

Q1.

Which device captured the image?

Q2.

When was the image captured?

Q3.

Has the image been edited using any software?

Q4.

Is author information present?

Q5.

Does the image contain GPS coordinates?

Q6.

Can the metadata help identify a suspect or source device?

Q7.

Which metadata field would be most valuable in a cyber forensic investigation and why?

Expected Learning Outcome

After completing this practical, students will be able to:
Perform professional metadata analysis.
Interpret EXIF metadata.
Identify source devices.
Detect image editing software.
Locate author and ownership information.
Analyze GPS metadata.
Understand the evidentiary value of metadata in digital investigations.