
0%
Empowering Investigative Minds


Forensic Science is the application and implementation of scientific methods and techniques for the purpose of justice. It involves analyzing evidence, identify suspects, understand the circumstances of a crime, and establish connections between crime scenes, individuals, and criminal activities.
Committee for establishment of SFSL
Committee on Teaching of forensic science in University
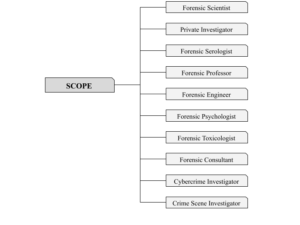
The scope of forensic science is broad and encompasses various scientific disciplines and applications. Here are the primary areas:
Crime Scene Investigation: Involves the identification, documentation, collection, and preservation of evidence at crime scenes, ensuring its integrity for analysis.
Forensic Biology and DNA Analysis: Analyzes biological samples (e.g., blood, saliva, hair) for DNA profiling, crucial for identifying individuals and establishing connections between victims and suspects.
Forensic Chemistry: Focuses on analyzing substances like drugs, poisons, explosives, and other chemicals found at crime scenes to understand their composition and relevance.
Forensic Toxicology: Studies the effects of drugs, alcohol, poisons, and other chemicals in the body to help determine cause of death, impairment, or poisoning.
Forensic Pathology: Examines bodies to determine the cause and manner of death, often involving autopsies and analysis of injuries, disease, or trauma.
Forensic Anthropology: Analyzes human skeletal remains to establish identity, cause of death, and other information, particularly when the body is decomposed.
Forensic Odontology: Uses dental records and bite mark analysis to help identify victims or connect suspects to a crime.
Forensic Entomology: Studies insects and other organisms found on decomposing remains to estimate time of death and other forensic details.
Forensic Ballistics: Examines firearms, bullets, gunshot residues, and related materials to determine how a shooting occurred and identify weapons.
Forensic Document Examination: Analyzes handwriting, typesetting, ink, paper, and other document features to authenticate or detect forgery.
Digital Forensics: Investigates digital devices and data (e.g., computers, smartphones, networks) to recover, analyze, and interpret electronic evidence.
Forensic Psychology: Assesses the mental state of suspects, witnesses, and victims to determine competency, intent, or psychological motives.
Forensic Accounting: Analyzes financial records to detect fraud, embezzlement, or financial misconduct.
Forensic Engineering: Investigates accidents, structural failures, and product malfunctions to determine the cause and potential negligence.
Wildlife Forensics: Applies forensic science techniques to crimes involving animals, such as poaching and illegal trade of endangered species.
Cyber Forensics: Focuses on investigating cybercrimes, including hacking, cyberstalking, and other internet-based crimes.
Environmental Forensics: Analyzes environmental contamination to identify sources of pollution and hold parties accountable for environmental crimes.
Forensic Linguistics: Examines language patterns, word choice, and grammar in written or spoken communication to assess authorship or interpret meaning in legal contexts.
Forensic Archeology: Combines archeological methods with forensic science to uncover and examine remains and artifacts from historic crime scenes or mass graves.
Key aspects of ethics in forensic science:
Objectivity and Impartiality: Forensic scientists must remain unbiased, providing conclusions based solely on evidence, without personal beliefs or external pressures influencing their findings.
Accuracy and Reliability: Forensic analysis should follow established protocols and methods to ensure results are accurate, reproducible, and scientifically valid.
Confidentiality: Sensitive information from cases must be kept confidential to protect the rights and privacy of individuals involved, with data shared only with authorized personnel.
Integrity of Evidence: Evidence must be collected, handled, and stored correctly to prevent contamination, loss, or tampering, maintaining a strict chain of custody.
Honesty in Reporting: Reports should accurately reflect findings, including any limitations or uncertainties, without exaggerating results or making unsupported conclusions.
Competence: Forensic scientists should work within their area of expertise, continuously updating their skills and knowledge to provide reliable analysis.
Avoiding Conflicts of Interest: Scientists should disclose and avoid any conflicts that might compromise their objectivity, such as personal, financial, or professional interests.
Testimony Integrity: When testifying, forensic experts should communicate findings truthfully, clearly, and without bias, ensuring they do not mislead the court.
Respect for Human Rights: All forensic work should respect individuals’ rights, avoid unethical practices, and support justice without discrimination.
Accountability: Forensic scientists should be accountable for their work, open to peer review, and willing to admit and correct errors to maintain public trust in the field.
Each ethical principle ensures that forensic science upholds justice, reliability, and public confidence in legal proceedings.
Physical Evidence: Any tangible items that may be found at the crime scene, on the victims, or on the culprit are referred to as physical evidence.
Trace Evidence: The term “tracing evidence” refers to physical evidence that is present in minute but quantifiable numbers.
In a criminal investigation, the analysis of the evidence acquired at the scene is utilized to support or refute the case’s facts.
Physical evidence can be either:

There are several common search methods, each method is chosen based on the size, type, and nature of the search area and the specific goals of the investigation or study.
Chain of custody is the process of maintaining and documenting the handling, transfer, and storage of evidence from the moment it is collected until it is presented in court or analysis is completed. It ensures that evidence is accounted for and remains uncontaminated and tamper-free, preserving its integrity for legal and investigative purposes.

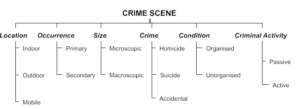
Crime Scene is the location where a crime has occurred or where evidence of a crime may be found. Its primary function is to serve as the physical space that holds crucial evidence. Crime scene could be static means a single, immovable location where the crime occurred (e.g., a room, building) or it could be dynamic in nature, involving movement, such as in a car chase or where evidence may have been transferred between locations.
Crime scenes vary based on
Preserving a crime scene is crucial to avoid contamination or loss of evidence. Preservation involves careful, methodical steps to secure the scene and protect all physical, biological, and digital evidence.
Steps in Crime Scene Preservation:
Challenges in Crime Scene Preservation:
Criminal investigations aim to systematically collect, analyze, and preserve evidence to reconstruct events and establish facts that identify suspects and victims, ultimately bringing perpetrators to justice. Investigators employ various forensic techniques and methods based on the crime type, scene characteristics, and the nature of the evidence.
The judicial system in India is organized in a hierarchy to address civil and criminal cases, each level having specific types, powers, and jurisdictions. Courts operate under various legal frameworks, such as the Criminal Procedure Code (Cr.P.C.), 1973, and the Indian Evidence Act, 1872, which also define the role of experts and admissibility of evidence.
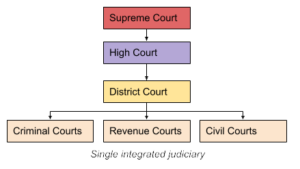
Supreme Court of India:
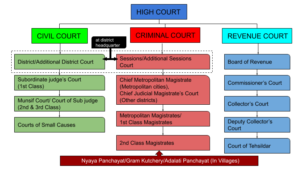
High Courts:
District and Sessions Courts:
Subordinate and Magistrate Courts:
NCRB (National Crime Records Bureau)
1. Objectives and Functions
2. Key Publications and Reports
3. Technological Initiatives and Training
4. Importance in Law Enforcement and Policy
Equality before law | Equal protection of laws |
|
|
Offences | Punishments |
|
|
Punitive | Preventive |
|
|
It is a method used to predict the characteristics, behavior, and psychological traits of offenders and victims in a crime investigation. It helps investigators narrow down suspects, understand motives, and anticipate possible future actions by analyzing behavior patterns and crime scene details.
Lie Detection (Polygraphy)
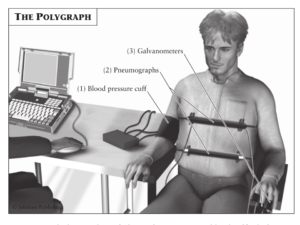
History
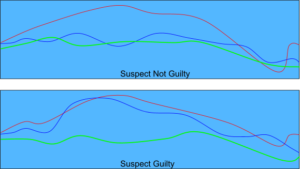
Principle
Working
Techniques
During questioning the subject following approach is applied
Limitations

Chadwick sign
Jacquemier’s sign
Hegar’s sign
Palmer’s sign
Osiander’s sign
Piskacek’s sign
Ballottement
Stallworthy sign
Mcdonald’s rule
Braxton hick
Uterine souffle
Changes see in Women
|
Features | Virgin | Deflorated |
Breast | Hemispherical and firm, areola pinkish, nipple small | Pendulous, enlarged |
Labia majora | Firm, lie in apposition | Separated and flabby |
Labia minora | Pink, soft | Enlarged, pigmented, separated, peep out |
Fourchette | Intact | May be intact/torn or may show healed scar |
Fossa navicularis | Less conspicuous | Disappears |
Hymen | Intact, edges are distinct and regular with narrow opening | Usually torn (in false virgin, it may remain intact) |
Vagina | Narrow, apposed, mucosa rugose, sensitive | Wide, capacious, rugosity may partially lost |
Disorder | Cause | Features | Sub-Categories |
Organic mental disorder | Organic or lesion | Primary is due to: primary brain pathology. Secondary is due to: brain dysfunction by systemic disease | • Delirium • Dementia • Organic amnestic syndrome |
Mental and behavioral disorders | Psychoactive substance use | • Acute intoxication • Withdrawal state • Dependence syndrome | |
Schizophrenia, schizotypal and delusional disorders | Disturbances of thought, perception, affect and behaviour | • Schizophrenia • Schizotypal disorder • Persistent delusional disorder • Acute and transient psychotic disorder • Induced delusional disorder • Schizo-affective disorders | |
Mood (affective) disorders | • Mania (manic depression) • Bipolar mood disorder • Recurrent depressive disorder | ||
Neurotic, stress-related and somatoform disorders | Disturbances of emotion | ||
Behavioral syndromes | Physiological and physical disturbances | • Anorexia nervosa, bulimia(Eating disorders) | |
Behavioural and emotional disorders | Childhood and adolescence | • Hyperkinetic disorders • Conduct disorders • Tic disorders |
Features | Psychosis | Neurosis |
Severity Contact with reality Insight Personality | Major Loss of contact Absent Impaired | Minor Contact preserved Present Preserved |
Homicidal Injuries
Suicidal Injuries
Accidental Injuries
Microscopic Methods for Estimation:
Within 30 minutes:
4 Hours:
4–12 Hours:
12–24 Hours:
24–72 Hours:
3–6 Days:
10–15 Days:
Histochemical methods analyze enzymatic activity in tissues to estimate wound age based on time elapsed:
1 Hour Post-Injury:
2 Hours Post-Injury:
4 Hours Post-Injury:
8 Hours Post-Injury:
Immediate Causes of Death:
Delayed Causes of Death:


iii. Temporal – 2
iii. Lacrimals- 2
vii. Vomer
viii. Mandible
SKELETAL REMAINS | ACCURACY |
Entire skeleton | 100 |
Skull + Pelvis | 98 |
Pelvis alone (best single bone) | 95 |
Skull alone | 92 |
Long bones | 80-85 |
Long bones + Pelvis | 98 |
Feature | Male | Female |
General size | Larger, more massive | Smaller, slender |
Long bones | Ridges, depression and process are more prominent. Bones of arms and legs are 8% longer | Less Prominent |
Shaft | Rougher | Smoother, thinner with relatively wider medullary cavity |
Articular surface | Larger | Smaller |
Metacarpal bones | Longer and broader | Shorter & Narrower |
Weight | 4.5 kg | 2.75 kg |
Maximum anteroposterior length of skull
Dolichocephalic (long skull) | below 75.0 |
Mesocephalic | 75.1 to 79.9 |
Brachycephalic (short skull) | 80.0 to 85.0 |
Hyper Brachycephalic | 85.1 and over |
Length
Chama Cephalic (flat skull) | 75.0 And under |
Ortho Cephalic | 70.1 to 75.0 |
Hypocephalic (High skull) | 75.1 And over |
Prognathous | 82º and under |
Mesognathous | 83º to 90º |
Hyperorthgnathous | 91º and over |
Frontal chord (frontal bone) | Nasion to bregma |
Parietal chord (parietal bone) | Bregma to lambda |
Occipital chord (occipital bone | Lambda to opisthion |
Feature | Male skull | Female skull |
General appearance | Larger, heavier, rugged, marked muscular ridges | Smaller, lighter, walls thinner, smoother |
Forehead | Receding, irregular, rough, less rounded | Vertical, round, full, infantile, smooth |
Cranial capacity | More capacious (1450-1550 cc) | Less capacious (1300-1350 cc) |
Glabella | Prominent | Less prominent |
Supraorbital/ superciliary ridge | Prominent | Less prominent |
Frontonasal junction | Distinct angulation | Smoothly curved |
Orbits | Square, rounded margins, small | Rounded, sharp margins, large |
Frontal and parietal eminence | Less prominent | Prominent |
Zygomatic arch | Prominent | Not prominent |
Occipital area (Muscle markings and protuberance) | Prominent | Not prominent |
Mastoid process | Large, round, blunt | Small, smooth, pointed |
Digastric groove | Deep | Shallow |
Condylar facet | Long, narrow | Short, broad |
Palate | Large, U-shaped, broad | Small, parabolic |
Foramen magnum | Relatively large, long | Small, round |
External auditory meatus | Bony ridge along upper border prominent | Often absent |
Feature | Caucasians | Mongoloids | Negros |
Orbits | Triangular | Rounded | Square |
Nasal Openings | Narrow and elongated | Rounded | Broad |
Sagittal Contour | Arched | Arched | Flat |
Palate | Triangular or V-shaped | Rounded or horseshoe shaped | Rectangular or broad U-shaped |
INDEX | FORMULA | MALE | FEMALE |
Washburn/Ischiopubic index | Length of pubis × 100 Length of ischium | 73-94 | 91-115 |
Sciatic notch index | Width of sciatic notch × 100 Depth of sciatic notch | 4-5 | 5-6 |
Sternal index | Length of manubrium × 100 Length of body | 46.2 | 54.3 |
Corporo Basal index | Breadth of body of 1st sacral vertebra × 100 Breadth of base of sacrum | > 42 | < 42 |
Sacral index | Transverse diameter of base of sacrum × 100 Anterior length of sacrum | < 114 | > 114 |
Kimura’s Base-wing index | Width of wing (ala of sacrum) × 100 Width of base transverse diameter of body of S1 | ||
Chilotic line index | Sacral part of chilotic line × 100 Pelvic part of the chilotic line
Chilotic line:
| ||
Feature | Male pelvis | Female pelvis |
General appearance | Massive, rougher, prominent muscular markings | Less massive, slender, smoother, muscular markings not prominent |
Shape | Deep funnel | Flat bowl |
Preauricular sulcus | Not frequent, narrow, shallow | More frequent, broad, deep |
Obturator foramen | Large, oval, base upwards | Small, triangular, apex forwards |
Iliac Crest | More Prominent | Less Rounded |
Acetabulum | Large, 52 mm diameter | Small, 46 mm diameter |
Sacrum | Large, Uniform Curvature, Promontory more prominent | Small, Upper half straight, Lower half curved forward, Promontory less prominent |
Sacroiliac articulation | Large, extends to 2½-3 vertebrae | Small, extends to 2-2½ vertebrae |
Greater sciatic notch | Narrow, deep, small | Broad, shallow, large |
Iliopectineal line | Well-marked, rough | Rounded, smooth |
Ischial tuberosity | Inverted | Everted |
Body of pubis | Narrow, triangular | Broad, square, pits on posterior surface, if borne children |
Subpubic angle | V-shaped, sharp angle, 70°-75° | U-shaped, rounded, broader angle, 90°-100° |
Pelvic brim or inlet | Heart-shaped | Circular or elliptical shaped |
Pelvic cavity | Conical, funnel shaped | Broad, round |
Pelvic outlet | Smaller | Larger |
Coccyx | Less movable | More movable |
Ischio-pubic index | 73 to 94 | 91 to 115 |
Sciatic notch index | 4 to 5 | 5 to 6 |
Feature | Male mandible | Female mandible |
General size | Larger and thicker | Smaller and thinner |
Chin | Square | Rounded |
Body height | At symphysis greater | At symphysis smaller |
Ascending ramus | Greater breath | Smaller breath |
Angle of body and ramus | Less obtuse (under 125º); prominent. and everted | More obtuse, and not prominent |
Condyles | Larger | Smaller |
Mental tubercle | Large and Prominent | Insignificant |
Feature | Mandible in Infancy | Mandible in Adult | Mandible in Old age |
Body | Shallow | Thick and long | Shallow |
Ramus | Short, oblique, forms obtuse angle with body | Less obtuse angle | Obtuse angle with body (about 140°) |
Mental foramen | Opens near the lower margin and directed forwards | Opens midway between upper and lower margins and directed horizontally backwards | Opens near the alveolar margin |
Condyloid process | At a lower level than coronoid process | Elongated and projects above coronoid process | Neck is bent backwards |
Feature | Male vertebral column | Female vertebral column |
Atlas, breadth | 7.4 to 9.9 cm | 6.5 to 7.6 cm |
Length of vertebral column | 73 cm | 60 cm |
Corporo-basal index of sacrum | 45 | 40.5 |
Feature | Male thorax | Female thorax |
General | Longer and narrower | Shorter and wider |
Sternum | Body longer and more than twice the length of the manubrium; upper margin is in level with lower part of the body of second thoracic vertebra; breadth more. Length more than 149mm. | Shorter and less than twice than the length of manubrium; upper margin in level with lower part of the body of third thoracic vertebra; breadth less. Length less than 149mm. |
Ribs | Thicker, lesser curvature and are less oblique | Thinner; greater curvature, and more oblique |
Clavicle | Longer, broader, heavier, less curved | Smaller, narrow, lighter, more curved |
Feature | Male femur | Female femur |
Head | Larger and forms about 2/3 of a sphere. Vertical diameter more than 47mm | Smaller and forms less than 2/3 of a sphere. Vertical diameter less than 45mm. |
Neck | Obtuse angle with the shaft about 125º | Less obtuse angle with the shaft |
Bicondylar width | 74 to 89 mm | 67 to 76 mm |
Angulation of shaft with condyles | Around 80º | Around 76º |
Indices of long bones
INDEX | FORMULA | VALUE IN RACE |
Brachial index | Length of Radius × 100 Length of Humerus | Europeans: 74.5 Negroes: 78.5 |
Crural index | Length of Tibia × 100 Length of Femur | Indians: 86.5 Negroes: 86.2 Europeans: 83.3 |
Humerofemoral index | Length of Humerus × 100 Length of Femur | Europeans: 69 Negroes: 72.4 |
Intermembral index | Length of Humerus + Radius × 100 Length of Femur + Tibia | Europeans: > 70 Negroes: < 70.5 |
Racial Differences in the Femur
Criteria & Propounder | Asian Origin | European Origin | African Origin |
Anterior Curvature (Stewart & Trudell) | straighter | more curved | straighter |
Proximal Diaphysis Shape (Gilbert & Gill) | anteroposterior flattening | rounder | rounder |
Intercondylar Notch Depth (Baker et al.) | undetermined | shallower | deeper |
Bergmann’s Rule | Body mass increases in inhabitants of colder climates | ||
Allen’s rule | Extremities increase in length in warmer climates | ||
Holliday and Falsetti’s | Discriminant Function Coefficients | ||
Duray | C3–C6 spinous processes have higher frequency of bifidity in whites than in blacks | ||
Feature | Male scapula | Female scapula |
Height | More than 157 mm | Less than 144 mm |
Glenoid cavity | Height greater | Height less |
Laws of ossification
Exception – Carpal bones ossification occur after birth. And Clavicle has 2 primary centres of ossification.
Exception – Lower end of femur. The secondary centre for the lower(distal) end appears before birth in the 9th month of fetal life. It fuses with the shaft between the 16th and 18th years.
Exception – Lower end of fibula. A secondary centre for the upper end appears in the 3rd or 4th year; and fuses with the shaft between the 17th and 19th years.A secondary centre for the lower end appears in the first year; and fuses with the shaft between the 15th and 17th years.
Exception – Upper end of femur. 3 secondary centres appear at the upper end of femur, one each for the head (1st year), the greater trochanter (4th year), and the lesser trochanter (around the 12th year). Each centre fuses independently with the shaft in the reverse order of appearance: the lesser trochanter at about 13 years, the greater trochanter at about 14 years, and the head around 16 years
Centers of bones | Appearance | Fusion |
Clavicle – Medial end Sternum Manubrium Body • Ist segment • IInd segment • IIIrd segment • IVth segment Xiphoid process | 15-19 years 5 month IUL
5 month IUL 7 month IUL 7 month IUL 10 month IUL 3 years | 20-22 years 60-70 years
14-25 years from below upwards 3rd and 4th-15 years 2nd & 3rd-20 years 1st & 2nd-25 years >40 years with the body |
Humerus (upper end) • Head • Greater tubercle • Lesser tubercle |
1 year. All three unite at 6 years 3 years 5 years |
18 years 4-5 years with head 5-7 years with greater tubercle |
Humerus (Lower end) • Medial Epicondyle • Capitulum • Trochlea • Lateral Epicondyle |
5-6 years 1 year 9-10 years 10-12 years |
16 years Capitulum,trochlea & L. epicondyle form conjoint tendon at 14 years,unites with shaft at 15 years |
Radius • Upper end • Lower end |
5-6 years 1-2 years |
15-16 years 18-19 years |
Ulna • Upper end • Lower end • Head Ist metacarpal • Head other metacarpals |
8-9 years 5-6 years 2 years 1½ to 2½ years |
16-17 years 18-19 years 15-17 years 15-19 years |
Hip bone • Triradiate cartilage • Iliac crest • Ischial tuberosity • Sacrum |
11-13 years 14-15 years 15-16 years 8 months IUL |
14-15 years 18-20 years 20-22 years 25 years |
Femur (Upper end) • Head • Greater trochanter • Lesser trochanter Femur (Lower end) |
1 year 4 years 14 years 9 month IUL |
17-18 years 17 years 15-17 years 17-18 years |
Tibia • Upper end • Lower end |
9 month IUL 1 year |
16-17 years 16 years |
Fibula • Upper end • Lower end |
4 years 1 year |
17-19 years 15-17 years |
Scapula • Coracoid base • Acromion process |
10-11 year 14-15 year |
14-15 years 17-18 years |
Hand bones | Foot bones | ||
Type of bone | Age of ossification | Type of bone | Age of ossification |
Capitate Hamate Triquetral Lunate Scaphoid Trapezium Trapezoid Pisiform | 2 months 3 months 3 year 4 year 5 year 6 year 7 year 9-12 years | Calcaneus Talus Cuboid Lateral cuneiform Medial cuneiform Intermediate cuneiform Navicular | 5 months 7 months 10 months 1 year 2 years 3 years 3 years |
SITE FOR X-RAY (REGION) | AGE (YEARS) | |
MALE | FEMALE | |
Elbow | 15-16 | 13-14 |
Wrist | 18-19 | 16-17 |
Shoulder | 18-19 | 17-18 |
Iliac crest | 19-21 | 18-19 |
Ischial tuberosity and inner end of clavicle | 21-23 | 21-22 |
Suture | Fuses after | |
Lateral and occipital fontanelle | 2 months after birth | |
Posterior fontanelle | 6-8 month of birth | |
Anterior fontanelle | 1½-2 years of birth | |
Metopic suture | 2-4 years but may extend upto six years | |
Basioccipital and basisphenoid | 18-20 years | |
Suture | Starts Closing | Closes by |
Sagittal | 25 years | 35-40 years |
Coronal | 25-30 | 40 years |
Lambdoid | 25-35 years | 45-50 years |
Pterion | 40 years | 65 years |
Mastoid-occipital | 45 years | 80 years |
Asterion | 80 years | |
Parieto-temporal | 70 years | |
Bertillon System of Identification
History
Facial reconstruction is of two types:
Steps of Facial Reconstruction
iii. Buccinator
Hyoid Bone
ossification of hyoid bone
I. Hyoid bone fuses from 6 centres.
II. Ossification begins in greater Cornu at 10 lunar months of intrauterine life.
III. Ossification in lesser cornu begins at 16 years
Cremains refers to the study of Cremated remains
Triquetral bone
iii)The triquetral bone ossifies between 9 months and 50 months
iv)formerly k/as cuneiform bone
v)It connects with the pisiform, hamate, and lunate bones
Sauvergrain & Nahum method is based on scoring : Elbow bones
Harris lines are :
(1) Lines of arrested growth in bones
Matiegka’s formula is used for :
(1) Calculating the skeletal weight from stature
Wormian bone
I.It is an extra bone piece that is present within a suture in the Cranium.
III. Also known as Inca bone
Steele and McKern’s formula : Calculation of a person’s height from fragmented bones
(1) Dupertuis and Hadden’s formula
(2) Trotter and Gleser formula
(3) Karl Pearson formula
Proportional relationship of size of various body parts with stature is known as Allometry
Identification an individualization from teeth
Forensic odontology: branch of dentistry deals with proper handling and examination of dental evidence with proper evaluation and presentation of dental findings in interest of justice
Methods applied in forensic odontology
History
In India
Famous notorious figures identified by forensic odontology
Dental identification
Factors for dental identification
Teeth formation
In utero
After birth
Temporary teeth | Eruption time in months | Complete root calcification in years |
Central incisors lower | 6-8 | 1½- 2 |
Central incisors upper | 7-9 | 1½- 2 |
Lateral incisors upper | 7-9 | 1½- 2 |
Lateral incisors lower | 10-12 | 1½- 2 |
First molar | 12-14 | 2- 2½ |
Canines | 17-18 | 2- 2½ |
Second molar | 20-30 | 3 |
Neonatal lines
Age | Number of teeth |
1 | 8 |
1½ | 16 |
2- 2½ | 20 |
Mixed dentition
In adults
Permanent teeth | Eruption time in years | Complete root calcification in years |
First molar | 6-7 | 9-10 |
Central incisors | 6-8 | 10 |
Lateral incisors | 8-9 | 11 |
First premolars | 9-11 | 12-13 |
Second premolars | 10-12 | 13-14 |
Canines | 11-12 | 13-14 |
Second molar | 12-14 | 14-16 |
Third molar | 17-21 | 18-25 |
Difference between temporary and permanent teeth
Temporary teeth | Permanent teeth |
Small narrow light and delicate | Big broad heavy and strong |
Crowns China white in colour | Crowns ivory white in colour |
Junction of crown with fang often marked by ridge | Junction of crown with fang are not so marked |
Edges serrated | Edges not serrated |
Neck more constricted | Neck less constricted |
Anterior teeth vertical | Anterior teeth usually inclined somewhat forward |
Molars are large | Premolars which replace temporary molars are usually small |
Crown are flat and their roots are smaller and more divergent | Crowns have cusp which are sharp roots are bigger and straight |
Methods of age identification
Gustafson’s method
DALIZ METHOD
LAMENDOLA’S METHOD
BOYDE’S METHOD
Special Features of Some Races
RH = root height
P = (periodontitis height ÷ RH) × 100,
T = (root dentine translucency height ÷ RH) × 100
Taxa | Flies | Beetles | ||||||||
Phylum | Arthropoda | Arthropoda | ||||||||
Class | Insecta | Insecta | ||||||||
Order | Diptera
| Coleoptera
| ||||||||
Family | • Calliphoridae • Sarcophagidae • Sepsidae • Piophilidae • Phoridae • Muscidae • Fannidae • Sphaeroceridae | • Carrion beetles (Silphidae) • Rove beetles (Staphylinidae) • Clown beetles (Histeridae) • Trogid beetles (Trogidae) • Hide and skin beetles (Dermestidae) • Checkered (or bone) beetles (Cleridae) • Sap-feeding beetles (Nitidulidae) • Ground beetles (Carabidae) | ||||||||
Genus & Species | • Lucilia sericata • Calliphora vicina • Calliphora vomitoria |
Process in Corpse Decomposition :
Rate of decomposition is temperature dependent
Time of body decomposition to a skeleton, in relation to temperature
Y = 1285 / X |
Y = number of days to mummification, or skeletonization
X= average temperature for the days before the body was found
Stages of post mortem changes : By Goff
On Land
Stage 1: Fresh stage.
Stage 2: Bloated Stage.
Stage 3: Active decay stage.
Stage 4: Post-decay stage.
Stage 5: Skeletonization.
Submerged in water
Floating decay stage.
Family | Example | Description |
Calliphoridae | Blowfly (Blue or Green Bottlefly) |
|
Sarcophagidae | Flesh Fly |
|
Muscidae | House Fly |
|
Piophilidae | Cheese skippers |
|
Family | Example | Description |
Silphidae | Carrion, Burying, Sexton beetles |
|
Staphylinidae | Rove beetles |
|
Carabidae | Ground beetles |
|
Dermestidae | Skin beetles |
|
Histeridae | Clown & Hister beetles |
|
Tenebrionidae | Darkling beetles |
|
Cleridae | Checkered & Ham beetles |
|
Scarabidae | Hide beetles |
|
Types of Feeders